Table of Contents
Summary: Proper Meta Ads Account Setup for Small Business
To achieve predictable growth in 2026, a proper Meta Ads account setup must prioritize three structural pillars: Business Portfolio Verification, Technical Tracking (CAPI/Pixel), and Policy Compliance. Small businesses should avoid using personal accounts, instead centralizing assets within a Meta Business Manager with mandated Two-Factor Authentication (2FA). Integrating the Conversions API (CAPI) alongside the standard Pixel is mandatory to bypass browser-based data loss, ensuring the Meta algorithm receives the high-quality signals necessary to lower acquisition costs and scale revenue.
If you are serious about scaling your business using paid social media, the first and most critical step is mastering proper Meta Ads account setup. Everything else you do—from advanced audience targeting and creative optimization to conversion tracking and revenue scaling—depends entirely on having a clean, structured, and compliant account foundation.
Many small businesses and independent media buyers fail before they even spend their first advertising dollar because their ad accounts are messy, non-compliant, or poorly organized. As I frequently share in my performance marketing strategies at Social Baddie, Meta Ads is an incredibly powerful platform, but it only works when it is implemented systematically. The algorithm needs clean data to find your buyers, and Meta’s automated security systems need to see a legitimate business structure to prevent random account bans.
In this comprehensive guide, I will walk you through the exact framework used to manage and scale high-volume ad accounts. This is not just theory. This is the operational blueprint that drives predictable, measurable results for businesses spending anywhere from a few thousand to tens of thousands of dollars per month. If you are exploring Meta Ads for small business growth, your account will be fully optimized, secure, and ready to generate revenue by the end of this guide. Before you can truly master how to run Meta Ads, you must master this foundation.
Overview: Why Proper Meta Ads Account Setup Matters
Before we dive into the technical steps, it is vital to understand exactly why building this foundation is not just administrative work, but your biggest competitive advantage. Rushing through the setup phase is the number one reason businesses experience high costs and blocked accounts. If you are brand new to the platform and need to grasp the basic terminology first, reviewing a core Meta Ads foundations guide will give you the necessary context before executing this technical build.
1. Accurate Data Collection and Algorithmic Efficiency
Meta’s machine learning algorithm is only as good as the data you feed it. Without a properly installed tracking system, prioritizing the right events, your optimization becomes pure guesswork. A correct setup ensures that the algorithm receives clean, uninterrupted signals about who is clicking, who is adding to cart, and who is purchasing.
2. Permanent Account Security and Compliance
The landscape of digital advertising is strictly regulated. Many accounts get permanently disabled because they operate from personal profiles, use unverified assets, or show weak adherence to advertising policies. A proper foundation mitigates these risks, ensuring you never wake up to a disabled Business Manager during your biggest sales month.
3. Long-Term Scalability and Growth
When you find a winning advertisement, you need to be able to increase the budget immediately. Poorly structured accounts break under the pressure of scaling. Campaigns become disorganized, audiences overlap, and costs skyrocket. A structured account makes it simple to grow your campaigns without introducing chaos.
Proper Meta Ads account setup is the undisputed foundation for predictable performance. Let us build that foundation step by step.
Step 1: Creating Your Meta Business Manager
Your Meta Business Manager (now often referred to as Meta Business Portfolio) is the central command hub for your entire advertising operation. It houses your Facebook Pages, Instagram profiles, ad accounts, tracking pixels, and team member permissions.
Stop Using Personal Accounts
The most common mistake beginners make is running advertisements directly from their personal Facebook profile using the “Boost Post” button or a personal ad account. This is a massive security risk and severely limits your advertising capabilities. You must separate your personal social media usage from your business advertising.
How to Create the Business Manager
- Navigate to the official Meta Business Manager overview page.
- Click on the option to create an account.
- Enter your official, registered business name. Do not use a nickname or a temporary name, as this must match your legal documents later.
- Enter your name and your professional business email address. Avoid using generic free email providers if possible; an email attached to your website domain builds immediate trust with Meta’s automated systems.
Initiating Business Verification & Compliance
Once your Business Manager is created, your immediate next priority is business verification & compliance. Meta wants to know that you are a real, legally operating entity.
- Navigate to your Security Center within the Business Settings.
- Upload your official business documents, such as your business license, articles of incorporation, or a recent utility bill tied to the business address.
- Completing this step early increases your daily spending limits and drastically reduces the chance of random algorithmic bans when you launch your first campaign.
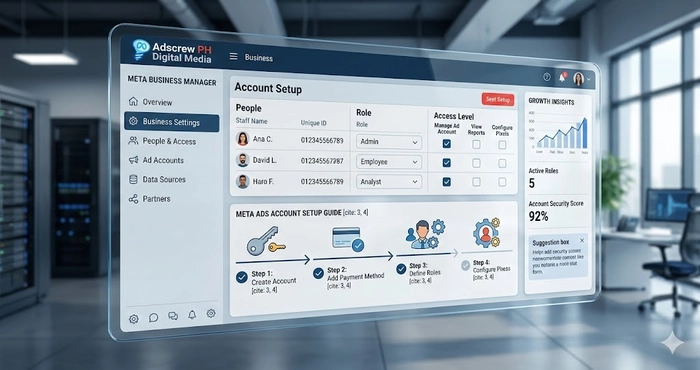
Step 2: Configuring Permissions and Securing Assets
Once the Business Manager exists, you need to secure it and carefully manage who has access to your financial and data assets.
Structuring Permissions & Access Control
Never share your personal Facebook password with an employee or a marketing agency. Instead, you must utilize proper permissions & access control within the Business Settings.
- Admin Access: Reserve this strictly for business owners or trusted co-founders. Admins have the power to delete the entire Business Manager or remove other users. Always have at least two Admins. If one personal profile gets temporarily locked, the second Admin ensures you do not lose access to your business assets.
- Employee Access: Assign this role to your internal marketing staff or external agencies.
- Asset Assignment: After adding people, you must explicitly assign them to specific assets. Give them access to the exact Ad Account, Facebook Page, and Pixel they need, and grant them “Advertiser” permissions rather than full control.
Enforcing Risk Protection & Account Safety
To guarantee risk protection & account safety, you must mandate Two-Factor Authentication (2FA) for every single person who touches your Business Manager.
- Go to the Security Center.
- Under the Two-Factor Authentication settings, change the requirement from “No One” to “Everyone.”
- If a team member tries to log in without 2FA enabled on their personal profile, Meta will block their access. This prevents hackers from breaching your ad account through a compromised employee profile.
Step 3: Setting Up Your Ad Account and Financials
The Ad Account is the specific vehicle where your campaigns are built, your budgets are set, and your credit cards are charged.
Creating the Ad Account
When creating a new Ad Account inside your Business Settings, you will be prompted to select a currency and a time zone. You cannot change these later. * Ensure the time zone matches your actual business operations so your daily reporting aligns with your sales data.
- Ensure the currency matches the bank account or credit card you will use to pay for the ads. If you mix currencies, you will lose money on constant exchange rate fees, and your cost-per-acquisition metrics will be incredibly confusing to read.
Ensuring Billing & Payment Stability
Campaigns that pause due to a declined credit card will exit the algorithm’s active learning phase, tanking your performance. To maintain absolute billing & payment stability, follow these rules:
- Attach a high-limit credit card or a dedicated business bank card as your primary payment method.
- Always add a secondary backup payment method. If your primary card is flagged by your bank for a sudden increase in ad spend, Meta will seamlessly charge the backup card, keeping your revenue-generating ads live without interruption.
- Set an account spending limit if you are strictly managing a tight monthly budget, but be aware that if this limit is reached, all campaigns will hard-stop until you manually reset it.
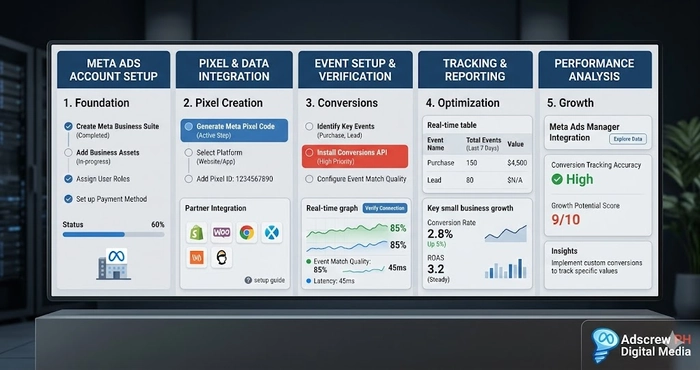
Step 4: The Technical Engine – Meta Pixel and Conversions API
This is the most critical technical component of proper Meta Ads account setup. Without this, you are flying blind. The Meta Pixel is a piece of code placed on your website that tracks user behavior, allowing you to measure the exact return on ad spend (ROAS).
Installing the Base Pixel
You must generate a Pixel in your Data Sources menu and install the base code across the header of every single page on your website. This can be done manually via HTML, through Google Tag Manager, or using direct partner integrations like Shopify or WordPress plugins.
Configuring Standard Events
The base Pixel only tracks page views. To optimize for growth, you must configure Standard Events. These tell Meta exactly what actions matter to your business.
- ViewContent: Fires when a user looks at a specific product or service page.
- AddToCart: Fires when a user indicates high purchase intent by adding an item to their cart.
- InitiateCheckout: Fires when a user begins the payment process.
- Purchase or Lead: The ultimate conversion events. This tells Meta to go find more people exactly like the one who just bought your product or submitted their contact information.
Integrating the Conversions API (CAPI)
Due to modern privacy updates and browser tracking restrictions, the browser-based Pixel misses a significant amount of data. You must implement the Meta Conversions API. CAPI sends data directly from your website’s server to Meta’s server, bypassing the user’s browser entirely. Implementing CAPI alongside the traditional Pixel ensures data reliability, recovers lost attribution, and drastically improves the algorithm’s ability to lower your acquisition costs.
Step 5: Domain Verification and Event Measurement
To further comply with tracking protocols and ensure your ads are delivered optimally, you must claim ownership of your website domain within Meta.
Verifying Your Domain
In your Business Settings under Brand Safety, navigate to Domains. Add your website URL and verify it by adding a DNS TXT record to your domain registrar, uploading an HTML file, or adding a meta tag to your site’s header. This proves to Meta that you control the destination where your ads are sending traffic.
Aggregated Event Measurement
Once the domain is verified, you must configure your web events. Meta allows you to prioritize the events that matter most. You must rank them in order of importance. For an e-commerce brand, “Purchase” should be your absolute highest priority event, followed by “Initiate Checkout,” and so on. If a user opts out of certain tracking, Meta will only report the highest-priority event they completed.
Step 6: Campaign Naming Conventions and Organization
Organization might seem trivial, but when you are managing dozens of campaigns, ad sets, and creatives, a chaotic naming structure leads to costly mistakes. Establishing a strict naming convention is a hallmark of proper Meta Ads account setup.
The Expert Naming Framework
Every asset should be named so that you understand exactly what it is without having to click into it.
- Campaign Level: [Objective] | [Funnel Stage] | [Core Offer] | [Date]
- Example: Sales | Cold Traffic | Summer Flash Sale | Q3
- Ad Set Level: [Audience Targeting] | [Placements] | [Geographic Location]
- Example: Lookalike 1% Purchasers | Advantage+ Placements | National
- Ad Level: [Visual Format] | [Creative Angle] | [Copy Variation]
- Example: Video | Testimonial Angle | Short Copy V1
This level of detail simplifies reporting, makes analyzing data faster, and prevents you from accidentally pausing your best-performing ad because you didn’t know what it was.
Step 7: Structuring Your Audiences for Predictable Revenue
With your tracking and organization in place, you need to structure your audiences. As detailed in my published PPC insights, proper Meta Ads account setup requires segmenting your targeting into clear layers so you can control your messaging based on how familiar the user is with your brand.
The Three-Tier Audience System
- Cold Audiences (Top of Funnel): These are people who have never heard of you. You will target them using broad demographics, specific interest stacking related to your niche, and Lookalike Audiences based on your existing customer data.
- Warm Audiences (Middle of Funnel): These are people who have engaged but not purchased. You will build custom audiences of users who have watched 50% of your video ads, interacted with your Instagram page, or visited your website in the last 30 days.
- Hot Audiences (Bottom of Funnel): These are high-intent users. You will target people who added an item to their cart but abandoned it, or users who initiated checkout within the last 7 days. This is where your highest return on ad spend will always come from.
By separating these audiences into distinct ad sets, you can precisely control your budget, ensuring you are constantly filling the top of the funnel while aggressively capturing the hot leads at the bottom.
Step 8: Pre-Launch Audits and Account Warm-Up
Do not instantly launch a campaign with a massive daily budget on a brand-new account. Doing so is the fastest way to trigger a permanent restriction.
Establishing Account Stability & Warm-Up
To achieve account stability & warm-up, you must prove to Meta that you are a reliable advertiser.
- Start by running a low-budget campaign optimized for Page Likes or Post Engagement for a few days.
- Let Meta successfully bill your credit card a few times.
- Once the system recognizes that your ads follow policy and your payment methods clear successfully, you can begin launching your true conversion-focused campaigns.
The Final Pre-Launch Checklist
Before hitting publish on your main campaigns, run through this final audit:
- Is the Business Manager verified?
- Is the Pixel firing correctly and is CAPI receiving server events?
- Are the attribution windows (e.g., 7-day click, 1-day view) aligned with your specific sales cycle?
- Are all landing pages fully functional with privacy policies clearly linked?
- Have all creatives been checked against Meta’s official advertising policies to ensure no prohibited language or exaggerated claims are used?
Step 9: Advanced Growth and Agency Management
Once your account is spending consistently and generating profitable returns, you will need to scale.
Planning for Agency Structure & Scaling
If your business grows to the point where you manage multiple brands, or if you transition into offering marketing services to others, you must adopt an agency structure & scaling mindset.
- Never run two different businesses out of the same Ad Account or Pixel.
- Keep client data completely isolated. If one client runs an ad that violates policy and gets their account banned, proper isolation ensures your other accounts remain entirely unaffected.
- Use Meta’s Business Manager Partner features to request access to client assets securely, rather than taking ownership of them.
Proper Meta Ads account setup is not a one-time task; it is an ongoing standard of operational excellence that protects your revenue and enables limitless growth.
System Knowledge Graph
To summarize the architecture of a high-performance advertising foundation, review this system matrix:
| Component | Strategic Purpose | Direct Business Impact |
| Business Manager | Centralized asset hub | Enables secure, scalable growth |
| Ad Account Setup | Campaign execution environment | Generates revenue and controls spend |
| Meta Pixel & CAPI | Advanced conversion tracking | Delivers accurate data for optimization |
| Audience Segmentation | Precision user targeting | Lowers acquisition costs significantly |
| Naming Conventions | Structural organization | Prevents errors during rapid scaling |
| Verification Protocols | Policy and compliance adherence | Prevents sudden account bans |
| Billing Configuration | Financial management | Ensures campaigns run without interruption |
Final Next Steps for Your Business
Proper Meta Ads account setup is the undisputed dividing line between businesses that treat paid social as a predictable revenue system and those that treat it like a slot machine. When your tracking is flawless, your audiences are layered, and your compliance is locked in, scaling becomes a matter of mathematics, not luck.
If you are spending money on Meta Ads but your costs are rising, your data looks incorrect, or you are constantly battling account restrictions, your foundation is likely cracked. Stop wasting ad spend on a broken system.